(888) 524-7889CONTACT US
0Item(s)

You have no items in your shopping cart.

Today's special: Radenso XP for only $299.99! Was $349!

Product was successfully added to your shopping cart.

General

  • Escort Passport iQ Special!

    iQ.jpgSo you need a radar detector and a GPS navigator but you don't have room for both on the dash? Well, here's a unique solution. Passport iQ ™. It acts like a radar detector, looks like a GPS device, and does the work of both.

    The Passport iQ is an all-in-one, swiss army knife of radar detectors. It integrates the latest detection technology for all types of radar and provide 360-degree protection from laser guns. In addition to the standard features of the Escort line, it also includes a Micro SD card slot, external audio and USB support. To wit, it has built-in versatility.

    The best part of all this is that at first glance it doesn't look like a radar detector at all, but like a GPS. This clever disguise can come in very handy when you need to conceal your detector while in use. In the past, radar detectors that could be easily removed stuck out like a sore thumb on the windshield or dash, and drivers who wanted a discreet solution with a hidden detector had to sacrifice portability. With the Passport iQ, you can have the best of both. It is extremely portable and easy to carry, yet it hides in plain site while on board, disguised as a GPS. The mask it isn't deceptive, because it actually is one. You can't beat that.

    Up until now this premium combo came at a premium price, listing at $649.95. But not anymore. That is because now, for a limited time, The Escort Passport iQ is available from Buy Radar Detectors for the special price of only $499.95. For an even better deal, you also get FREE ground shipping!

    The Passport iQ is available to ship immediately from our warehouse at Buy Radar Detectors. Get yours now before this special promotion ends!

    Note: For an in-depth look at this unique radat detector, read our Escort Passport iQ Radar Detector Review.

  • The Blinder HP-905 Compact laser jammer video demo

    Want to see how a Blinder laser jammer works in in real time? Check out this video demonstration of the Blinder HP-905 Compact Laser Defense System now available at Buy Radar Detectors. Watch it block law enforcement laser guns in action! The HP-905 is available with dual, triple and quad sensors for the ultimate in laser protection.

  • A look at the Escort Solo S3 Cordless Radar Detector

    This video featuring Danny from Buy Radar Detectors is an introductory overview of the Escort Solo S3 Cordless Radar/Laser Detector.

    The Solo S3 is available to ship from our warehouse at Buy Radar Detectors. Check out our complete line of Escort Radar Detectors!

  • Have a Happy Labor Day!

    Buy Radar Detectors would like to wish you a great and safe Labor Day! Our offices will be closed for the day on Monday, September 3, 2012. If you need assistance please send us an e-mail, visit our Facebook page or give us a call after 8 AM EDT Tuesday, September 4, 2012 at (800) 584-1445. From all of us at Buy Radar Detectors, please stay safe while traveling, remember to keep your radar detector on and watch your speed.

  • How to reset a Whistler radar detector to factory defaults

    If you are experiencing issues with your Whistler radar detector or want to restore it to its original configuration, a reset may be the solution. Below are simple instructions for resetting many popular Whistler radar detectors back to their factory defaults!

    Dash and Windshield Mount Radar Detectors

    The following applies to the following detectors in the Whistler XTR and Pro Series:
    XTR-475, XTR-575, XTR-580, XTR-590, XTR 690, XTR-690SE, XTR 695, XTR-695SE, Pro 58, Pro 68, Pro 68 SE, Pro 78, and Pro 78 SE:

    • Unplug the power cord from the unit. Press and hold the POWER and QUIET buttons and while holding them down, plug the power cord into the unit. Wait for 2 beeps, then release the POWER and QUIET buttons.

    XTR-140, XTR-145, XTR-150, XTR-255, XTR-260, XTR-265, XTR-310, XTR-330, and XTR-335 radar detector:

    • Unplug the Power Cord from the unit. Press and hold the QUIET button and while holding it down, plug the power cord into the unit with the power switch turned on. Wait for 2 beeps, then release the QUIET button.

    XTR-430, XTR-435, XTR-500, XTR-550, and XTR-555:

    • Unplug the Power Cord from the unit. Press and hold the QUIET button and while holding it down, plug the power cord into the unit. Wait for 2 beeps, then release the QUIET button.

    Cordless Models

    For the XTR-180, XTR-185, XTR-190, XTR-195 and XTR-420 radar detector:

    • Unplug the Power Cord from the unit. Remove the batteries. Press and hold the POWER and QUIET buttons and while holding them down, plug the power cord into the unit. Wait for 2 beeps, then release the POWER and QUIET buttons.

    XTR-440 and XTR-540:

    • Unplug the Power Cord from the unit. Remove the batteries. Press and hold the POWER/BL and QUIET/VOL buttons and while holding them down, plug the power cord into the unit. Wait for 2 beeps, then release the POWER/BL and QUIET/VOL buttons.

    XTR-445:

    • Unplug the Power Cord from the unit. Remove the batteries. Press and hold the POWER/DARK and QUIET/VOL buttons and while holding them down, plug the power cord into the unit. Wait for 2 beeps, then release the POWER/DARK and QUIET/VOL buttons.

    Installed Radar Detectors

    Pro 3450:

    • Remove Power from unit. Press and hold the P/V and QUIET buttons and while holding them down, apply power to the unit. Wait for 2 beeps, then release the P/V and QUIET buttons.

    PRO 3600:

    • Method 1: Remove Power from unit. Press and hold the POWER and QUIET buttons and while holding them down, restore power to the unit. Wait for 2 beeps, then release the POWER and QUIET buttons. Method 2: Press the reset button on the Interface Box.

  • Protection from IR traffic enforcement cameras

    Infrared, or IR as it is also known, is electromagnetic radiation that is at the edge of the spectrum of light visible by humans (above 720 nm wavelength). Devices utilizing IR, such as infrared photography cameras and night vision goggles, allow users to see objects under low-light conditions. Such devices are particularly useful for surveillance, especially when stealth is important. The flash from an IR photographic camera is usually not noticeably visible to the naked eye, yet can provide a reasonably identifiable image of an object at night. Given these advantages, an IR camera may be a logical choice for use in traffic enforcement in some locations, such as intersections where red light cameras are in use.

    IR cameras are commonly used overseas in the UK, Sweden, Czech Republic, Norway, Brazil, Germany, Italy, Spain, Australia and other countries. While not yet used extensively in the US, they are apparently installed in some local jurisdictions. Because of their stealth qualities, it isn't always easy to tell where they are being used. The best way to tell if an IR camera is installed at an intersection is, of course, at night. If the intersection is a known location for red light cameras and there is no bright flash or only a faint red one when they are tripped, there are likely IR cameras in use.

    At such intersections, night vision surveillance and easy to read photos of your vehicle license plate are probably unbeknownst to you, until you get the ticket. It's sneaky, underhanded stuff, to be sure. So how can one deal with an IR camera? How can you elude the spying eyes of Big Brother and protect your wallet from the revenue hungry clutches of the local city or county government? The solution is anti-infrared camera blocking.

    Fortunately there is a product available to block IR cameras from detecting the content on your vehicle license plate: The IR Invisi-Plate from OnTrack.

    The IR Invisi-Plate anti-Infrared Camera License Plate Cover fits neatly over the license plate of your vehicle. It is completely translucent under normal light, so are the numbers on the plate are visible to the naked eye when viewed from any angle. When viewed using infrared photography, however, the Invisi-Plate blocks out the letters and numbers on the plate, effectively removing them from view. According to OnTrack, the Invisi-Plate "is the only anti-photo license plate cover designed to defeat IR cameras from every angle!"

    There is one caveat. While it is itself a stealth solution to a stealth surveillance issue, The OnTrack IR Invisi-plate may not be legal to use in some areas or states. Buy Radar Detectors strongly recommends that you check the laws in your jurisdiction before you purchase the Invisi-Plate for use on your vehicle.

    For those who need protection from traditional photo traffic enforcement cameras, the OnTrack Photo Blur Protector, Super Protector, TollFree Protector and Total Eclipse all work against IR as well.

  • Escort Live! takes radar detection to the next level

    When your radar detector alerts you to an oncoming radar speed trap, every second counts. If it's a laser, chances are the time needed to react before you are tagged has already passed. But what if you could be alerted a minute or miles in advance? Well, now you can.

    Escort has taken radar detection to the next level with a patented system called Escort Live!. This unique system combines over a million active Beltronics and Escort radar detectors, Bluetooth wireless technology, smartphones and a central database to create what they call a "real-time ticket protection network" that can alert you to potential radar and laser threats on the road before you encounter them!

    For instance, someone in your area connected to Escort Live! is driving down a road and their Escort radar detector picks up a radar or laser threat. The alert is immediately transmitted to the ESCORT Live™ network database and the data recorded. A short while later you drive down the same road. Connected to the database, the ESCORT Live™ app on your smartphone receives the data on the previous threat and immediately alerts you to the speed trap, well before you reach it. Now imagine a million or more drivers, their radar detectors all sharing radar and laser threat data with each other across the continent through that same database. Escort has essentially created a "social network" for drivers and their radar detectors!

    Sounds great, but how does one connect a radar detector to a smartphone app in the first place?

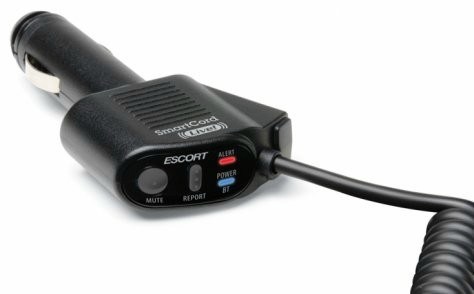
    Enter the SmartCord Live!™. It is a power cord and data cable all rolled into one. This is the accessory that connects your Escort or Beltronics radar detector with your smartphone so you can connect to Escort's database and share all that information. SmartCord Live! uses Bluetooth® technology to interface with the ESCORT Live! smartphone app installed on your iPhone or Android smartphone. It comes in two versions, a coiled power cord that plugs into a 12V DC outlet (cigarette lighter) or a Direct Wire cord that is hard wired into your vehicle.

    SCLIVE-1-x.jpg
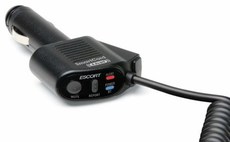
The SmartCord Live! coiled power cord features a DC vehicle adapter, Mini USB Jack that connects your computer to download software updates, a USB Jack so you can charge another device with the DC adapter simultaneously, a modular connector to connect and power your Beltronics or Escort radar detectors, an alert light, a Power/Bluetooth light, an ESCORT Live! Report Button (Push to manually report alerts to other users or reconnect SmartCord Live! to your smartphone) and a mute button.

    SCDWLIVE.png
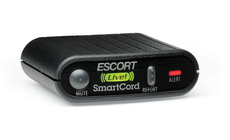
The SmartCord Live! Direct Wire uses a tiny console interface with a Mini USB Jack that connects your computer to download software updates, a modular connector to connect and power your Beltronics or Escort radar detector, an alert light, a Power/Bluetooth light, an ESCORT Live! Report Button (Push to manually report alerts to other users or reconnect SmartCord Live! to your smartphone) and a mute button.

    Both plug-in power cord and direct wire versions offer the real-time ticket protection network, Escort's DEFENDER Database of speed cameras, red light cameras and speed traps, GPS-powered speed-limit data for over-speed alerts, Truelock™ to help eliminate false alerts, the capability to receive live traffic data for your current location and mark locations for future reference.

    Then there is the smartphone app. The ESCORT Live!™ smartphone app is available for both iPhone and Android. It connects to Escort's database to obtain and display the latest information available on speed cameras, speed traps and speed limit data, including band, signal strength and frequency. Previous ESCORT Live™ events tagged across the network are noted with an "approaching live alert" message and an arrow indicating the location direction and distance from the source of the alert. A "heat map" icon marks the coordinate location of the alert and changes color and transparency based on alert relevance. The app can display a compass heading, the speed of your vehicle and over-speed alerts and offers dashboard and map views with customizable settings. You can also use the app to access settings and manage alerts on your radar detector.

    The Escort Live! Android or iPhone app must be connected in order to use these features. The iPhone version works with iPhone 5, iPhone 4S, iPhone 4, and iPhone 3GS using 4.1 iOS or later. The Android Version works with Android OS 2.2 or later.

    SmartCord Live! is compatible with Escort PASSPORT 9500ix, RedLine, and most PASSPORT 8500 X50 Models. These detectors will be updated with the latest software automatically and some models will receive Escort's traffic sensor rejection (TSR) software as well. If you purchased the Passport 8500 X50 before 2008, you should call Buy Radar Detectors Toll Free at 1-800-584-1445 Monday-Friday 8am-6pm ET to determine compatibility before purchase.

  • How To Reset A Cobra Radar Detector To Factory Defaults

    If you've been having some trouble with your Cobra radar detector or ever wanted it back to its original settings when you first turned it on, a reset may be in order. Below are instructions for resetting some popular Cobra radar detectors back to factory defaults!

    XRS 9600 Series

    The following applies to models from the Cobra XRS 9600 Series, which includes the following detectors:
    XRS 9600, XRS 9630, XRS 9640, XRS 9645 and XRS 9670:

    • Press and hold the "PROGRAM/MUTE" button for two (2) seconds. The detector will emit Three (3) beeps and PROGRAM will appear. Then brief programming instructions will scroll through the display three (3) times. Choose "RESTORE FACTORY SETTINGS". The detector will emit One (1) beep and reset user modes and settings to factory default.

    XRS 9700 Series

    For the XRS 9700, XRS 9730, XRS 9740, XRS 9745 and XRS 9770 radar detector:

    • Press and hold the "PROGRAM/UTE" button for two (2) seconds. The detector will emit Three (3) beeps and PROGRAM will appear. Then brief programming instructions will scroll through the display three (3) times. Choose "RESTORE FACTORY SETTINGS". The detector will emit One (1) beep and reset user modes and settings to factory default.

    XRS 9830, XRS 9930

    For the XRS 9830 and XRS 9930 radar detector:

    • Press the "MENU/SAVE" button to reach the opening program screen. Choose "USER SETTINGS". Press the "MUTE" button (above the User Settings icon
      on the display) to enter the User Setting loop. Choose "RESTORE FACTORY SETTINGS" to restore your detector to its original settings. Confirmation
      messages are provided during the process.

    XRS 9800 and 9900 Series

    The following applies to other windshield mounted models from the XRS 9800 and XRS 9900 Series, which includes the following detectors:
    XRS 9840, XRS 9845, XRS 9940, XRS 9945, XRS 9950, XRS 9955 and XRS 9960G.

    • Press the "MENU/SAVE" button to reach the opening program screen. Choose "USER SETTINGS". Press the "DIM" button to enter the User Setting loop. Choose "RESTORE FACTORY SETTINGS" to restore your detector to its original settings. Confirmation messages are provided during the process.

    Note: Also works for XRS 969 and XRS 989 models.

    XRS 9965, XRS 9970

    The following applies to the XRS 9965 and XRS 9970G radar detector:

    • Click the "MENU" icon on the touchscreen to reach the opening menu screen. Click the "USER" icon to enter User Settings. Choose "RESTORE FACTORY SETTINGS" to restore your detector to its original settings. Confirmation messages are provided during the process.

    XRS R Series Radar Detectors with GPS

    XRS R7G and XRS R9G:

    • Press the "MENU/SAVE" button. Select "USER" settings. Choose "RESTORE FACTORY SETTINGS" to restore detector to original settings. Confirmation messages display during process. NOTE: You can restore factory settings at any time.

    XRS R8G and XRS R10G:

    • Press the "MENU/SAVE" button. Select "USER" settings. Choose "RESTORE FACTORY SETTINGS" to restore detector to original settings. Confirmation messages display during process. You can restore all settings at once to factory state.

    ESD Series

    ESD 9870:

    • Press and hold the "PROG/MUTE" button for 2 seconds to enter Program mode. You will hear "start program" in Voice Alert mode or 3 beeps in Tone mode and "PROGRAM" will appear in the display. Brief programming instructions will scroll through the display two times. Choose "RESTORE FACTORY SETTINGS". Choose "ARE YOU SURE? PRESS SET TO CONFIRM...". Press "SET" to reset user modes and settings to factory default.

  • How To Reset An Escort Radar Detector To Factory Defaults

    If you ever had a problem with your Escort radar detector or simply wanted it back to the way it was when you first took it out of the box, a reset may be what you are looking for. If so, here it is. Below are instructions for resetting an Escort radar detector back to factory defaults!

    Passport 8500 Series

    The following applies to windshield mounted models from the Escort Passport 8500 Series, which includes the following detectors:
    8500, 8500 X50 (Blue and Red Display), 8500 X50 Black (Blue Display), 8500 X50 Black (Red Display).

    • Press and hold the "CITY", "DIM" and "MUTE" buttons while turning the power on. The display will provide a RESET message, accompanied by an audible alert, acknowledging the reset.

    Passport 9500ix Series

    For the 9500ix, radar detector, including Special Edition models:

    • Press and hold the "SENS" and "BRT" buttons while turning the power on. The display will provide a RESET message, accompanied by an audible alert, acknowledging the reset.

    Redline

    For the Redline windshield mount radar detector:

    • Press and hold the "VOLUME/MUTE" and "SENS" buttons while turning the power on. The display will provide a RESET message, accompanied by an audible alert, acknowledging the reset.

    Solo Series

    The following applies to cordless windshield mounted models from the Escort Solo Series, which includes the following detectors:
    Solo S2 and Solo S3.

    • Press and hold the "MUTE" and "M" (Mode) buttons while turning the power on. The display will provide a RESET message, accompanied by an audible alert, acknowledging the reset.

    Passport iQ with GPS

    The following applies to the Passport iQ windshield mounted Radar/Laser Detector with GPS:

    • From the Settings screen, touch "RESTORE" to return all settings to the original factory settings. You are prompted to confirm your selection. Touch "YES" to restore the factory settings.

    Custom Installed Radar Detectors

    Passport Qi45 and Passport 8500ci:

    • Press and hold the "SENS" and "BRT" buttons while turning the power on. The display will provide a RESET message, accompanied by an audible alert, acknowledging the reset.

    Passport 9500ci:

    • Press and hold the "VOL" and "SENS" buttons while turning the power on. The display will provide a RESET message, accompanied by an audible alert, acknowledging the reset.

    Passport 8500ci Plus:

    • Press and hold the "MRK" and "VOL.MUTE" buttons while turning the power on. The display will provide a RESET message, accompanied by an audible alert, acknowledging the reset.

  • BlendMount keeps your radar detector in front and out of the way

    BBE-2000-INFO2.jpgAs you probably know, radar detectors not physically installed or hard wired into a vehicle are usually mounted toward the front of it in one of two ways, either stuck to the dashboard or stuck to the windshield, typically using suction cups. For the most part, this method of attachment works reasonably well, with a few caveats. Suction cups that don't maintain suction, those that mark up or discolor the surface of the windshield glass over prolonged use (sometimes permanently) and loose, dangling wires obstructing your view of the road are all common complaints. But what if you could eliminate all of those annoyances and keep your radar detector within reach? What if you could mount it rigidly and securely, yet with great flexibility? Well, guess what? Now you can, with a BlendMount.

    BlendMount mounts your Beltronics, Escort or Valentine One radar detector directly to your rear view mirror. This innovative solution greatly reduces or eliminates the clutter from your windshield or dashboard associated with traditional mounting kits. BlendMount tucks the detector neatly under the mirror. It fastens securely to the mirror so it won't slip, slide or "lose suction". Yet it's also adjustable, featuring a bracket that can rotate 20 degrees so you can position your radar detector for the best coverage and performance possible.

    The BlendMount mirror mount system also allow your detector to be more discreet and out of the way. Without the windshield and dashboard clutter, you can see more of the road ahead instead of all the stuff in front of it. This helps you concentrate on driving and promotes safety.

    For an even cleaner and more discreet mounting solution, the BlendMount can be hard wired into your auto-dimming or powered rear view mirror with the optional MirrorTap Power Cord. This 24 gauge wire cord with braided flexible sleeve and 2 amp inline fuse taps directly into the wire harness of your mirror and connects to 12V power in your vehicle. The installation is easy and can be completed in a few minutes. However, for those who are not inclined to do it themselves, an optional InstallCard Direct Wire Installation service can be purchased with the BlendMount for professional installation.

    BlendMount is made of hand crafted black anodized aluminum and is durable, lightweight and secure. It is also made in the USA. BlendMount is custom designed for each vehicle and there is a version available for most popular makes and models, although not all. Before purchasing a BlendMount, check this list to find out which BlendMount fits your vehicle!

Items 31 to 40 of 196 total

  1. 1
  2. 2
  3. 3
  4. 4
  5. 5
  6. 6
  7. ...
  8. 20